DIY Autonomous Cars 101: Recognizing Street Signs
It’s been a long time since we have posted anything on this blog but on a popular demand we are starting a new series. In this series we will discuss on all the modules that are required for building an autonomous car. Now, when we started this blog, neural networks weren’t that deep and GPU’s weren’t much powerful. But now we got some decent boxes like deep neural nets, convolution neural nets, we can make our systems a lot more intelligent than it was ever possible. To be specific about this, we won’t be creating our own autonomous vehicle in this series as we don’t really have the money for it. But we know how to build different modules for it which you and us can further compile them together to, form a complete system.
First article will be dedicated for recognizing the street signs. The car will be moving around without any human control so first let us cover the safety mechanisms. In the figure below, we can see an autonomous mobile robot system representation by Roland Siegwart. This is the generic model we are going to use to represent our systems.
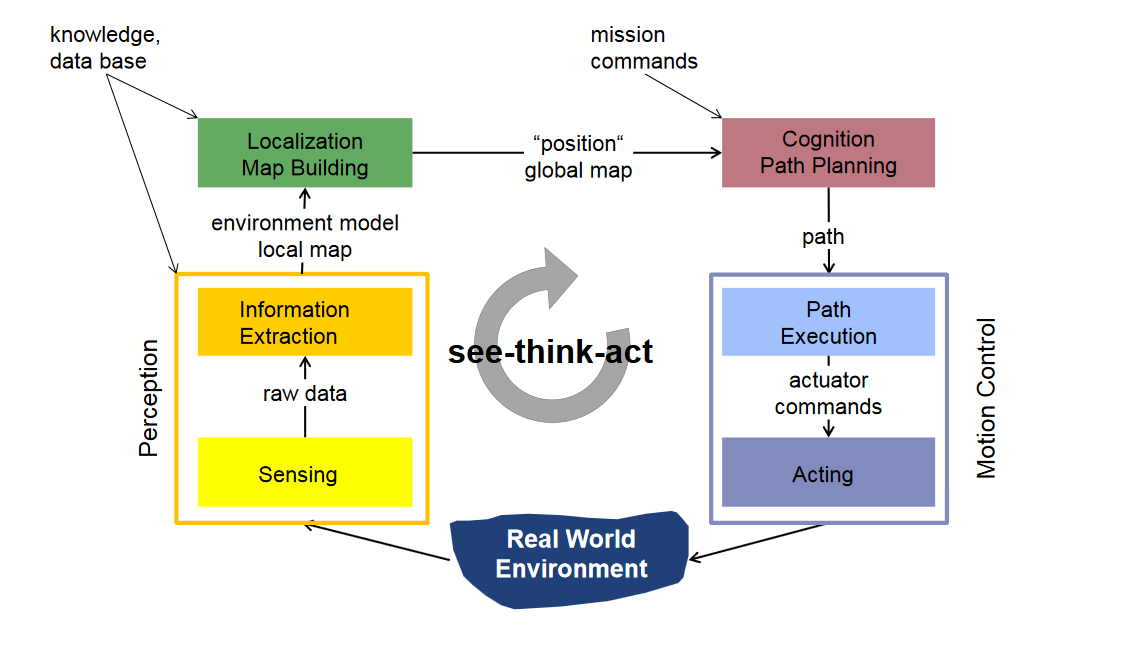
The basic principle about any autonomous system is See-Think-Act. If we know how to perceive the world, we can use that knowledge to implement a control scheme and provide the control input to actuate our system. Assuming our Autonomous car has a computer on board and a Camera on the dashboard, we can move ahead with our system.
We know about these traffic signs, we have to make our machine understand them. The camera will be taking pictures of the road and it will be observing the traffic signs too, we have to send these images to a certain module which should tell us about the kind of the traffic sign that we are seeing. So, if it is a Stop sign, the processor can tell the car to stop, or if it is a speed limit sign, the processor will tell the car to slow down.
Different methods can be used to perform this classifications. We are using deep neural networks on this because they kind of outperforms the other classical approaches and gives better accuracy. The images can be taken from different angles and in different lights. Thus it is a little difficult for classical approaches to identify the signs. Deep neural networks performs really well in these cases as it also reduces the need of feature engineering.


The model we are going to use here is by Visual Geometry group from Oxford. They have trained this model on thousands of images beforehand and these kind of neural networks are called pre-trained networks. These models is said to be giving better performances on generalizing rather than starting the training from scratch for randomly initialized weighted networks. The dataset we are going to use here is German Traffic Sign Benchmark Dataset. The dataset has 43 different traffic signs with about 50000 images. The images are not very alike as you can see from the set above. Just to be sure, when you are planning to train these models, be sure to use a High performance computer for that as the process is computationally expensive. You can also try Amazon Web Services, those people perform GPU instances for really cheap prices.
The Deep neural network looks something like this, (Image copied from OpenNN website, they also provide a really good library for Deeper Neural Networks. Be sure to check that one too).
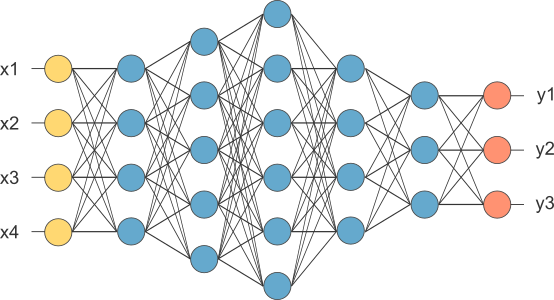
The deep neural network will not necessarily look like this, it generally have more than 7-8 layers. There are different architectures too like LSTM, InceptionNet, etc. I leave it up to you to explore those, or let me know if you want to know more about them, I will write an article about those too.
To train this network, first we have downloaded the dataset to our system and then the data is sorted into Training and Validation set. The reason behind doing this is to have some form of validation of our neural network for unseen data. So we will know if our network can work on the general cases or not. If it works on the validation set, we can safely say that it works on the general cases. The images in the mentioned dataset ar in *.ppm format, if you prefer to have your images in *.jpeg format you can try following code snippet.
g=glob('*/*.ppm')

for i in range(0,len(g)):

im=Image.open(g[i])

im.save(g[i][:-4]+'.jpg')
I have added the libraries for including the model on my github repo, the link is at bottom of this article.
The pre-trained network can be loaded and fine-tuned from there.
Here is the code snippet to do that
batch_size=64batches = get_batches(path+’train’, batch_size=batch_size)
val_batches = get_batches(path+’valid’, batch_size=batch_size*2, shuffle=False)(val_classes, trn_classes, val_labels, trn_labels,
val_filenames, filenames, test_filenames) = get_classes(path)from vgg16bn import Vgg16BN
model = vgg_ft_bn(43)trn = get_data(path+’train’)
val = get_data(path+’valid’)model.compile(optimizer=Adam(1e-3),
loss=’categorical_crossentropy’, metrics=[‘accuracy’])model.fit(trn, trn_labels, batch_size=batch_size, nb_epoch=3, validation_data=(val, val_labels))
We will train the network for few epochs, we are fine tuning this so to use this network as a feature extractor. The feature extracted from here will be used with a simpler classifier to separate them into different classes.
conv_layers,fc_layers = split_at(model, Convolution2D)
conv_model = Sequential(conv_layers)
conv_feat = conv_model.predict(trn)
conv_val_feat = conv_model.predict(val)
This will split the pretrained network into two parts and we will use conv_model to extract the features. conv_model.predict will convert the images into features by convoluting them into a 512X14X14 shape.
These features are now filtered through the network and these can be seperated into classes using a simpler classifier. Here is a code snippet to do that.
MaxPooling2D(input_shape=conv_layers[-1].output_shape[1:]),

BatchNormalization(axis=1),

Dropout(0.125),

Flatten(),

Dense(512, activation='relu'),

BatchNormalization(),

Dropout(0.5),

Dense(512, activation='relu'),

BatchNormalization(),

Dropout(0.25),

Dense(43, activation='softmax')
This is the smaller network we are going to use, the last dense layer will provide a (43,) output, which will be a probability of the sign being in the certain class.
Again, the same method of training these images we follow the same steps,
model2.compile(Adam(lr=0.001), loss='categorical_crossentropy', metrics=['accuracy'])model2.fit(conv_feat, trn_labels, batch_size=batch_size, nb_epoch=3,
validation_data=(conv_val_feat, val_labels))
Keep it running till it reaches about 98-99% accuracy for validation set.
Final thing is to verify if it works or not, I have written a function to do this, it is just to show that the model has been fitted well on these images.
signs=['20','30','50','60','70','80','below 80','100','120','No passing','No overtaking by heavy vehicles','Right of way at next crossroad','priority road','Give way','stop','No vehicles','No vehicles over 3.5Tons','No entry','General Caution','Dangerous Curve to left','Dangerous Curve to right','Double curves to left','Bumpy road','slippery road','road narrows on the right','Roadworks','Traffic Signal','Pedestrians','Children Crossing','Bicycle Crossing','Road freezes easily and is then slippery','Wild Animals Crossing','No Parking','Turn Right','Turn Left','Ahead only','Straight or Right','Straight or Left','Keep Right','Keep Left','Roundabout','End of No Overtaking','End of No Overtaking by Heavy vehicles' ]def show_pred(i):
temp=bn_model.predict(conv_feat[i:i+1])
plt.imshow(np.rollaxis(trn[i],0,3))
print(signs[np.argmax(temp)])
show_pred(32039)This is giving us the following outputs
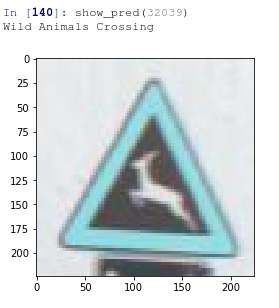
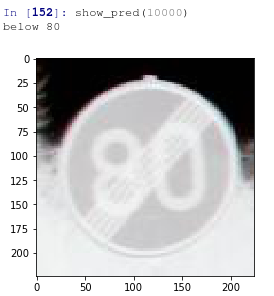


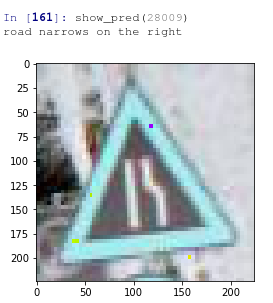
As we saw, it gives perfect classification to the traffic signs. The different angles and unclear images are not affecting it’s performance.
The whole code for this module can be found in my github repo.
In the next article, we are going to cover the steering angle adjustment depending on the cars position on the road.
